WLAN: Unterschied zwischen den Versionen
Raphii (Diskussion | Beiträge) |
K (Kategorie:Howto hinzugefügt) |
||
| Zeile 206: | Zeile 206: | ||
# EAP-Methode: EAP-TTLS | # EAP-Methode: EAP-TTLS | ||
# Authentifizierungsmethode: Unverschlüsseltes Kennwort (PAP) | # Authentifizierungsmethode: Unverschlüsseltes Kennwort (PAP) | ||
| + | |||
| + | [[Category:Howto]] | ||
Aktuelle Version vom 5. Januar 2025, 23:10 Uhr
We're moving our wifi infrastructure to an authenticated and encrypted ssid. At the moment it's hard to change our internal wifi password, because our door system depends on it. If you are not in our internal wifi you can't operate the door.
This is one reason why we want to use 802.1x with EAP-TTLS. Every member has it's own username/password combination which can be reset or changed through a webinterface. If a member quits the space, we just have to deactivate the account and the internal access is gone.
The other reason is: Every member has its own encrypted channel to our access points. In addition the member has the possibility to check, if the SSID can be trusted (avoid roque APs) with an ssl certificate
certificate
The certificate is not needed anymore
Linux
NetworkManager (GUI)
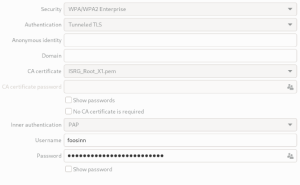
- Select the "backspace 802.1x" network in your WiFi settings
- Select /etc/ssl/certs/ISRG_Root_X1.pem
- Select "TTLS" and "PAP" as the authentication and inner authentication method, respectively (see below)
- Fill in your username and password (see below)
NetworkManager (nmcli)
# update your nickname and if you want change the cert path
nickname=fnord

# copy and paste this
device=$(nmcli d show | grep -B1 'GENERAL.TYPE.*wifi$' | head -n1 | cut -f2 -d: | xargs)
nmcli c add save yes \
  ifname "$device" \
  type wifi \
  con-name bckspc \
  ssid "backspace 802.1x" \
  802-1x.ca-cert "/etc/ssl/certs/ISRG_Root_X1.pem" \
  802-1x.eap ttls \
  802-1x.identity "$nickname" \
  802-1x.phase2-auth pap \
  wifi-sec.key-mgmt wpa-eap

# to connect use your gui or this command
nmcli c up bckspc --ask
netctl
Save config as /etc/netctl/$interfacename-backspace_8021x. You have to restart netctl-auto (e.g. systemctl restart netctl-auto@$interface)
Description='backspace WPA2 802.1X'
Interface=wlp3s0
Connection=wireless
Security=wpa-configsection
IP=dhcp
ESSID="backspace 802.1x"
WPAConfigSection=(
    'ssid="backspace 802.1x"'
    'proto=RSN WPA'
    'key_mgmt=WPA-EAP'
    'eap=TTLS'
    'identity="USERNAME"'
    'password="YOUR_PASSWORD"'
    'ca_cert="/etc/ssl/certs/ISRG_Root_X1.pem"'
    'phase2="auth=PAP"'
)
FYI: Replace the interface name according to your system
wpa_supplicant
Add to /etc/wpa_supplicant/wpa_supplicant.conf:
network={
 ssid="backspace 802.1x"
 key_mgmt=WPA-EAP
 eap=TTLS
 identity="USERNAME"
 password="YOUR_PASSWORD"
 phase2="auth=PAP"
 ca_cert="/etc/ssl/certs/ISRG_Root_X1.pem"
}
connman
UNTESTED!
[service_backspace]
Type=wifi
Name=backspace 802.1x
EAP=ttls
Phase2=PAP
Identity=USERNAME
Passphrase=YOUR_PASSWORD
CACertFile = /etc/ssl/certs/ISRG_Root_X1.pem
Sailfish OS
Tested and working
Put the following into /var/lib/connman/wifi_bckspc-8021x.config
then
systemctl restart connman
[service_backspace]
Type = wifi
Name = backspace 802.1x
EAP = ttls
Phase2 = PAP
Identity = USERNAME
Passphrase = PASSWORD
CACertFile = /etc/ssl/certs/ISRG_Root_X1.pem
wicd
ctrl_interface=/var/run/wpa_supplicant
network={
 ssid="backspace 802.1x"
 scan_ssid=$_SCAN
 identity="USERNAME"
 password="YOUR_PASSWORD"
 proto=WPA2
 key_mgmt=WPA-EAP
 group=CCMP
 pairwise=CCMP
 eap=TTLS
 anonymous_identity="$_ANONYMOUS_IDENTITY"
 phase2="auth=PAP"
 ca_cert="/etc/ssl/certs/ISRG_Root_X1.pem"
}
Warning: This is not yet tested. ca_cert certificate checking should work as it does for netctl and wpa_supplicant. Adapted from 31c3 wiki
Android
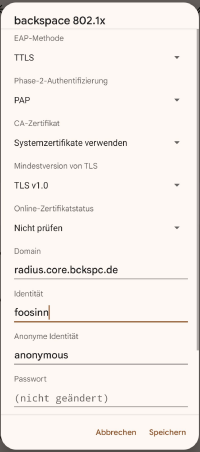
This is how you can connect with the android operating system to our 802.1x WIFI (WPA2 Enterprise)
- Modify/Configure your backspace 802.1x connection according to the screenshot below
- Attention: Some newer Android versions require a domain name if you use the certificate. Use radius.core.bckspc.de
macOS and iOS
A ready profile file can be downloaded here (you need to provide your LDAP credentials when asked). You don't need to follow the other steps if you use this file. Note: For iOS you need to extract this ZIP file and send it to you phone (e.g. via email).
After downloading the profile search in the System Settings for "Profile". Accept the Wifi profile here and enter you credentials. The "Backspace 802.1x" wifi should now be kown and you can connect.
The following procedure has been tested using macOS 10.11 El Capitan to macOS 10.14 Mojave.
Earlier versions of macOS offered to specify the authentication protocol when connecting to a wireless network. However, in newer versions you'll have to install a configuration profile in order to connect to our network using 802.1X with EAP-TTLS/PAP. This configuration profile contains our certificate and all required settings.
It is fairly easy to generate a configuration file for your devices yourself with the added bonus of already including your username and password. This file can be used for all your Macs and iOS devices.
To generate the config file you need to download the Apple Configurator from the Mac App Store. [1]
Start the Configurator and choose File -> New Profile
In the General tab give the profile a name.
Then go down to Wi-Fi and configure the Payload:
SSID: backspace 802.1x
Security: Enterprise WPA2
EAP-TTLS
you can add your username and password here
Inner Authentification: PAP
Choose Save from the File menu and give the profile a name.
You can now install the profile on your Mac. (The installation only seems to work, if you have installed the Certificate under "Certificates" in the Configurator. But you must not click the certificate under "Trust" in the Wi-Fi payload, because that will fail the authentification. See below for trusting the RADIUS server.)
To install the file on your iOS device, simply connect the device to the laptop running Configurator via USB and drag the profile file onto the device when it shows up in the application.
Alternatively you can send the file to yourself via email. Tap the file in the Mail app and install it on your iOS device. WARNING: This will likely send your credentials unencrypted through the internet!
When installing your profiles the systems will tell you that the certificate is not signed and that you need to trust the RADIUS server. You just need to accept both and are ready.
Windows 8 and above
Look at this tutorial in German language.
Windows 11 (tested 01.10.2024)
- Open the "new" system control panel
- "Netzwerk und Internet"
- "WLAN"
- "Bekannte Netzwerke verwalten"
- "Netzwerk hinzufügen"
- Netzwerkname: backspace 802.1x
- Sicherheitstyp: WPA2-Enterprise AES
- EAP-Methode: EAP-TTLS
- Authentifizierungsmethode: Unverschlüsseltes Kennwort (PAP)


