EN/NyanCat Wall: Unterschied zwischen den Versionen
(Die Seite wurde neu angelegt: „{{Infobox Projekt |name = NyanCat Wall |status = stable |autor = schinken |beschreibung = Nyan Nyan Nyan…“) |
Stp (Diskussion | Beiträge) K (Stp verschob die Seite NyanCat Wall en nach EN/NyanCat Wall) |
||
| (12 dazwischenliegende Versionen von 3 Benutzern werden nicht angezeigt) | |||
| Zeile 1: | Zeile 1: | ||
{{Infobox Projekt | {{Infobox Projekt | ||
| − | |name = NyanCat Wall | + | |name = NyanCat Wall (en) |
|status = stable | |status = stable | ||
|autor = [[Benutzer:schinken|schinken]] | |autor = [[Benutzer:schinken|schinken]] | ||
| Zeile 13: | Zeile 13: | ||
== Description == | == Description == | ||
| − | + | To create a playground for grown-up kids, we had to do something about the boring white walls surrounding it. So we decided to use the well-known internet meme ''Nyan cat'' as a decoration. Our member [[Benutzer:Schinken|schinken]] had a [http://calgarycosplay.com/nyancat.php nyan cat scarf] left, which we used. | |
| − | To create a | ||
A video of the final version can be found here: [http://www.youtube.com/watch?v=NBWjVZSPluQ Nyan Cat Wall, YouTube] | A video of the final version can be found here: [http://www.youtube.com/watch?v=NBWjVZSPluQ Nyan Cat Wall, YouTube] | ||
== RGB LEDs == | == RGB LEDs == | ||
| + | |||
[[Datei:nyancat_led.jpg|thumb|200px|left|LEDs in our Wall]] | [[Datei:nyancat_led.jpg|thumb|200px|left|LEDs in our Wall]] | ||
| − | |||
We used 16 LEDs for this project. Each LED was fitted with a 470 Ohm resistor to enable us to use 12 Volts as supply voltage. These LEDs can be ordered on ebay in a 50-piece package for a couple of euros. | We used 16 LEDs for this project. Each LED was fitted with a 470 Ohm resistor to enable us to use 12 Volts as supply voltage. These LEDs can be ordered on ebay in a 50-piece package for a couple of euros. | ||
| − | A simple wire was used for the electrical connection. This is the same wire we used in our [[Hausbus|bus system]]. To solder the LEDs to the wire, we cut the wire isolation with a cutter at the GND and +12V wire and attached some soldering. After soldering the LEDs to the wires, everything was secured against short-circuiting with | + | A simple wire was used for the electrical connection. This is the same wire we used in our [[Hausbus|bus system]]. To solder the LEDs to the wire, we cut the wire isolation with a cutter at the GND and +12V wire and attached some soldering. After soldering the LEDs to the wires, everything was secured against short-circuiting with isolation tape. |
All the soldering was done while power was supplied, to detect errors before it was filled up with concrete again. | All the soldering was done while power was supplied, to detect errors before it was filled up with concrete again. | ||
| + | |||
| + | |||
| + | |||
| Zeile 34: | Zeile 36: | ||
[[Datei:nyancat_more_leds.jpg|thumb|200px|right|cable slots]] | [[Datei:nyancat_more_leds.jpg|thumb|200px|right|cable slots]] | ||
| − | |||
| − | To install the RGB LEDs we drilled | + | To install the RGB LEDs we drilled holes into the wall. Using a chisel to get the slots was not the perfect way to do it because the wall is quite spongy. Pieces of the wall broke out and needed to be fixed with cement later. |
| − | In | + | In a second trial we used an angle grinder with a disc suitable for stone. This led to very clean cable slots. The disadvantage of this method was a lot of dust, which covered the complete room. |
Finally the slots were covered with filler and painted in white color. This was followed by a blue color paintjob, identical to the background color of the nyan cat animation. To protect the LEDs from our (unskilled :)) painters they were protected by masking tape. | Finally the slots were covered with filler and painted in white color. This was followed by a blue color paintjob, identical to the background color of the nyan cat animation. To protect the LEDs from our (unskilled :)) painters they were protected by masking tape. | ||
| − | The outlines of the stars were formed with masking tape and the inside was painted in white color. The last step was to attach the nyan cat scarf with some nails . | + | The outlines of the stars were formed with masking tape and the inside was painted in white color. The last step was to attach the nyan cat scarf with some nails. |
== Pictures == | == Pictures == | ||
<gallery> | <gallery> | ||
| + | Podest Nyancat.jpg|Gaming corner | ||
nyancat_closeup.jpg|Nyan Cat Closeup | nyancat_closeup.jpg|Nyan Cat Closeup | ||
| − | nyancat_first_leds.jpg| | + | nyancat_first_leds.jpg|First LEDs |
nyancat_led.jpg|Drilled Hole with LED | nyancat_led.jpg|Drilled Hole with LED | ||
nyancat_more_leds.jpg|Advanced state... | nyancat_more_leds.jpg|Advanced state... | ||
Aktuelle Version vom 15. November 2014, 12:31 Uhr
| NyanCat Wall (en) Status: stable | |
|---|---|

| |
| Beschreibung | Nyan Nyan Nyan Nyan... |
| Autor: | schinken |
| PayPal | |
Description
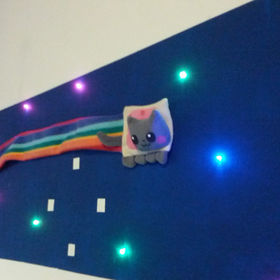
To create a playground for grown-up kids, we had to do something about the boring white walls surrounding it. So we decided to use the well-known internet meme Nyan cat as a decoration. Our member schinken had a nyan cat scarf left, which we used.
A video of the final version can be found here: Nyan Cat Wall, YouTube
RGB LEDs
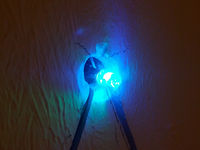
We used 16 LEDs for this project. Each LED was fitted with a 470 Ohm resistor to enable us to use 12 Volts as supply voltage. These LEDs can be ordered on ebay in a 50-piece package for a couple of euros.
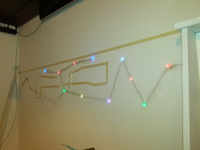
A simple wire was used for the electrical connection. This is the same wire we used in our bus system. To solder the LEDs to the wire, we cut the wire isolation with a cutter at the GND and +12V wire and attached some soldering. After soldering the LEDs to the wires, everything was secured against short-circuiting with isolation tape.
All the soldering was done while power was supplied, to detect errors before it was filled up with concrete again.
Bulding...
To install the RGB LEDs we drilled holes into the wall. Using a chisel to get the slots was not the perfect way to do it because the wall is quite spongy. Pieces of the wall broke out and needed to be fixed with cement later.
In a second trial we used an angle grinder with a disc suitable for stone. This led to very clean cable slots. The disadvantage of this method was a lot of dust, which covered the complete room.
Finally the slots were covered with filler and painted in white color. This was followed by a blue color paintjob, identical to the background color of the nyan cat animation. To protect the LEDs from our (unskilled :)) painters they were protected by masking tape.
The outlines of the stars were formed with masking tape and the inside was painted in white color. The last step was to attach the nyan cat scarf with some nails.


